How to Buy Starlink Kit in Kenya

I. Introduction to How to Buy Starlink Kit in Kenya

How to Buy Starlink Kit in Kenya

A. Brief Introduction to Starlink and Its Importance for Internet Connectivity in Kenya

Starlink is a satellite internet service developed by SpaceX, designed to provide high-speed broadband internet across the globe, especially in remote and underserved areas. Traditional internet service providers in Kenya often struggle to offer consistent and reliable connectivity, particularly in rural regions where infrastructure is limited or non-existent. This is where Starlink steps in, offering a transformative solution.

By utilizing a constellation of low-Earth orbit satellites, Starlink delivers fast and reliable internet access, making it possible for people in even the most isolated parts of Kenya to connect to the digital world. This is a game-changer for many communities, enabling access to vital resources like online education, telemedicine, and digital commerce. As Kenya continues to embrace digital transformation, Starlink’s role in providing widespread internet connectivity is crucial, ensuring that no one is left behind in the digital age.

B. How Starlink Works

Starlink operates by deploying a network of low-Earth orbit (LEO) satellites that orbit the planet at an altitude of about 340 miles (550 kilometers). Unlike traditional satellites that orbit much higher, these LEO satellites are closer to Earth, reducing latency and allowing for faster internet speeds.

The Starlink system consists of three main components: the satellite constellation, ground stations, and user terminals. Here’s how they work together:

  1. Satellite Constellation: Starlink’s satellites form a vast network that covers most of the Earth’s surface. These satellites communicate with each other using advanced laser technology, creating a mesh network that can efficiently route data across the globe.
  2. Ground Stations: Data from the satellites is transmitted to ground stations located at various strategic points around the world. These stations are connected to the broader internet infrastructure, allowing data to flow between the satellite network and the internet.
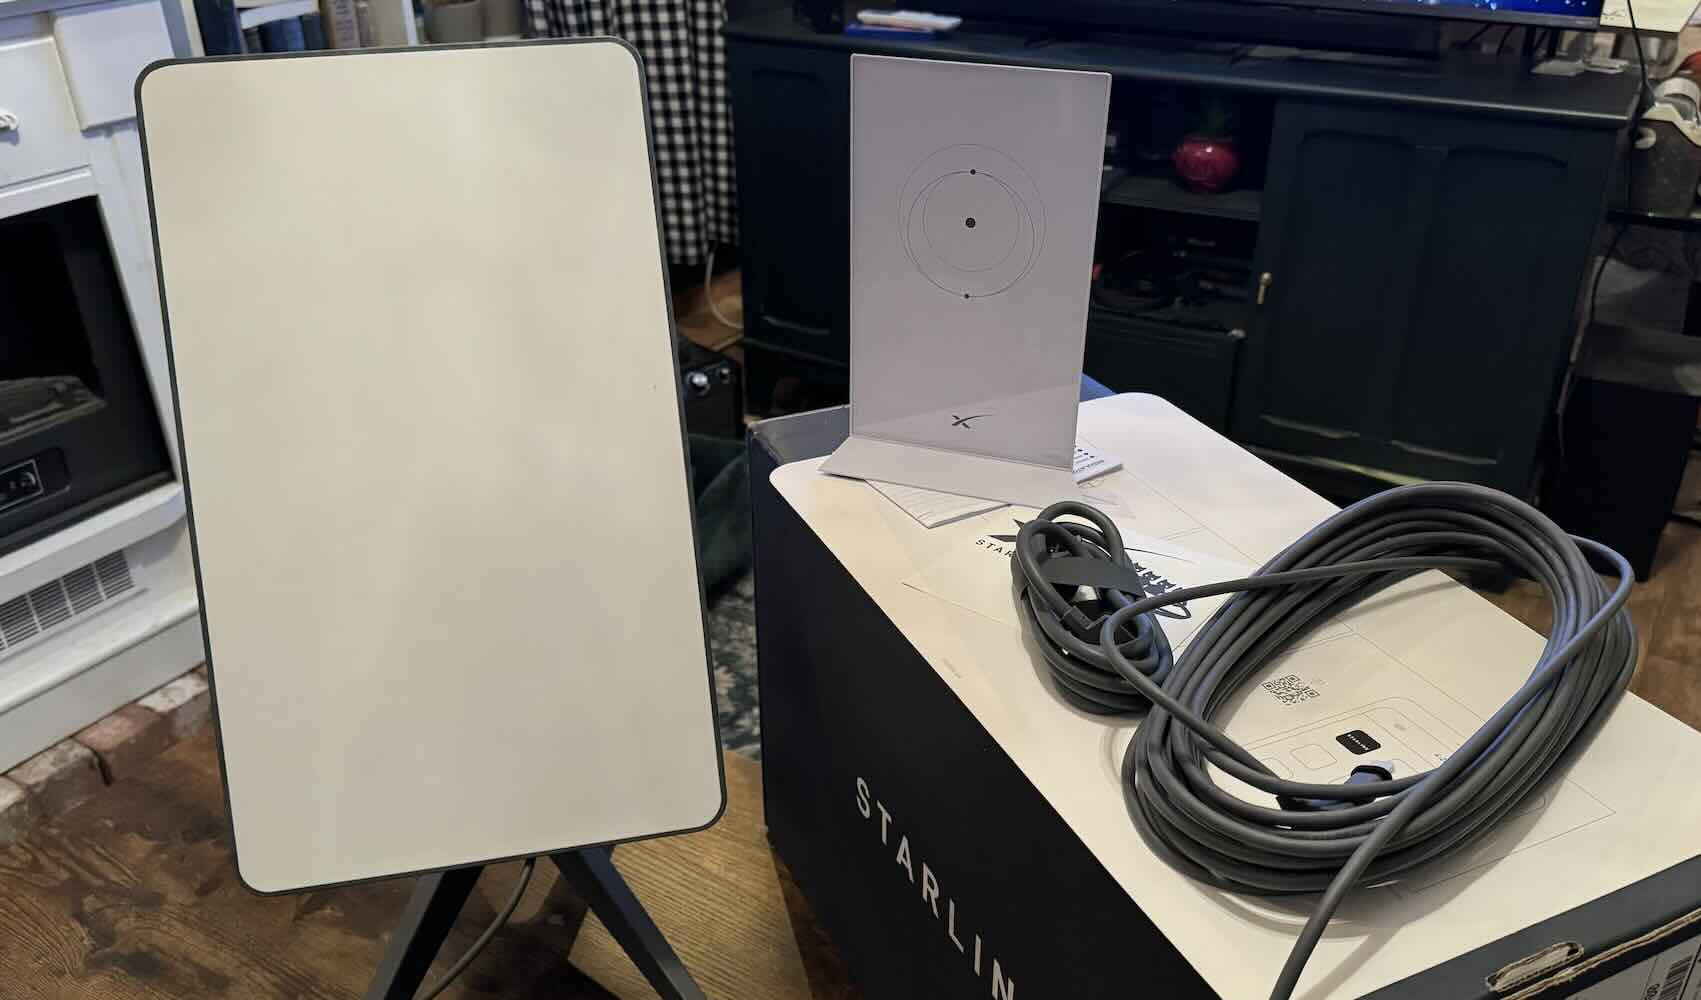
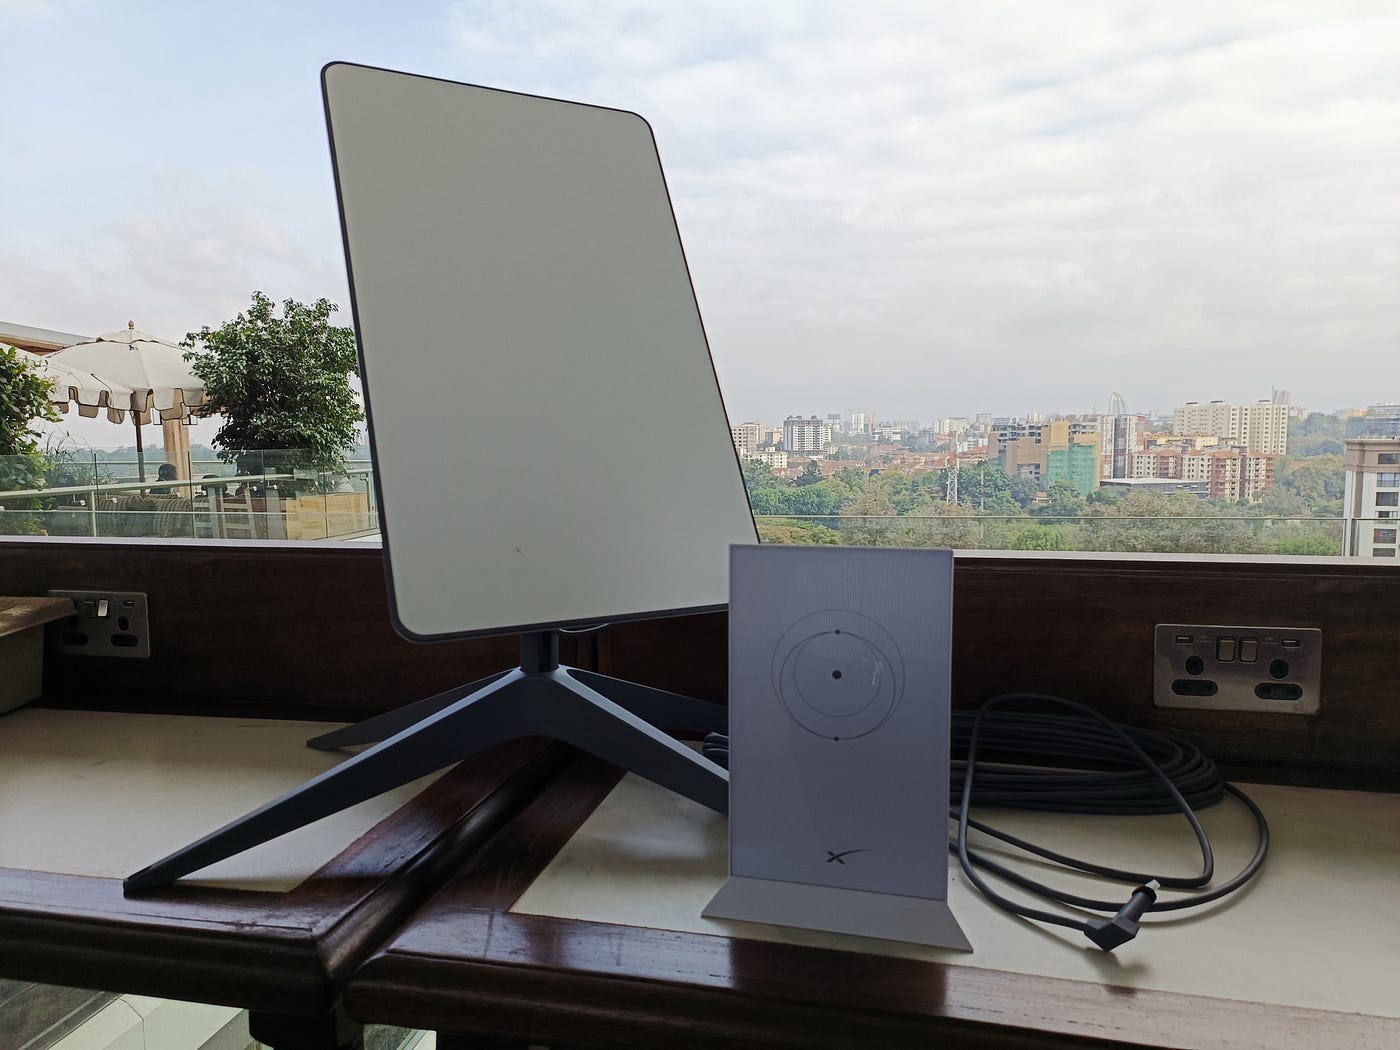
  3. User Terminals: To access Starlink’s internet service, users need a Starlink kit, which includes a satellite dish, also known as a “Dishy,” and a Wi-Fi router. The dish automatically aligns itself with the nearest satellites, providing a direct connection to the Starlink network. The user terminal then connects to the internet through this satellite link, delivering high-speed internet to homes, businesses, and other locations.

This innovative approach allows Starlink to provide internet service in areas where traditional fiber or cellular networks are unavailable or unreliable. By bypassing the need for extensive ground infrastructure, Starlink can quickly bring high-quality internet to even the most remote regions of Kenya, making it a vital tool for bridging the digital divide.

C. Benefits of Starlink Over Traditional Internet Service Providers in Kenya

Starlink offers several distinct advantages over traditional internet service providers (ISPs) in Kenya, particularly in areas where conventional infrastructure is lacking or underdeveloped. Here are some key benefits:

  1. Wide Coverage in Remote Areas:

    • Traditional ISPs in Kenya often face challenges in providing reliable service to rural and remote areas due to the high costs and logistical difficulties of laying fiber-optic cables or building cell towers. Starlink, on the other hand, can deliver high-speed internet to virtually any location, regardless of its remoteness, because it relies on satellites rather than ground-based infrastructure.
  2. High-Speed Internet:

    • Starlink provides broadband speeds that can rival or even surpass those offered by many traditional ISPs. Users can expect download speeds ranging from 50 to 150 Mbps, with some reports of even higher speeds as the network expands. This is particularly beneficial in regions where slow and unreliable internet has been the norm.
  3. Low Latency:

    • Unlike traditional satellite internet services, which often suffer from high latency due to the long distance between the satellites and Earth, Starlink’s low-Earth orbit satellites offer much lower latency. This is crucial for applications that require real-time communication, such as video conferencing, online gaming, and remote work.
  4. Rapid Deployment:

    • Establishing internet service through traditional means can take months or even years, especially in areas with challenging terrain. In contrast, Starlink can be set up quickly, with users able to install the satellite dish and start using the service within a short time frame after receiving their kit.
  5. Resilience and Reliability:

    • Starlink’s satellite network is less susceptible to disruptions caused by natural disasters, such as floods or earthquakes, which can damage ground infrastructure used by traditional ISPs. This makes Starlink a more reliable option for maintaining internet connectivity during emergencies.
  6. Scalability:

    • As Starlink continues to launch more satellites and expand its network, its capacity and coverage will increase, potentially offering even faster speeds and better service quality. Traditional ISPs, on the other hand, may struggle to scale their services in less profitable or harder-to-reach areas.
  7. No Long-Term Contracts:

    • Many traditional ISPs require customers to commit to long-term contracts with penalties for early termination. Starlink, in contrast, offers a more flexible model, allowing users to pay for the service month-to-month without being locked into a long-term commitment.

Starlink’s ability to provide high-speed, low-latency internet service to even the most remote parts of Kenya makes it a powerful alternative to traditional ISPs, particularly in areas where conventional options are limited or unavailable. This makes Starlink a critical tool for enhancing connectivity, driving economic development, and improving quality of life across the country.

D. Availability of Starlink in Kenya

Starlink has been gradually expanding its global coverage, and Kenya is among the countries where the service is now available. As of 2024, Starlink has made significant inroads into the Kenyan market, offering its satellite-based internet service to a growing number of users across the country.

Initial Rollout and Coverage Areas:

  • Starlink initially focused on covering urban and peri-urban areas in Kenya where the demand for high-speed internet is high but traditional ISPs have not fully met the need. Major cities like Nairobi, Mombasa, and Kisumu were among the first to receive coverage.
  • Following this, Starlink has expanded to more rural and remote regions, where the need for reliable internet connectivity is even more critical. This includes areas like Turkana, Marsabit, and parts of the Rift Valley, where traditional internet services are often inadequate.

Availability Across the Country:

  • Starlink’s coverage is rapidly expanding, with new areas being added frequently as more satellites are launched and the network grows. Most parts of Kenya, including remote and underserved areas, now have access to Starlink’s service, making it a viable option for individuals and businesses looking for reliable internet.
  • Interested users can easily check the availability of Starlink in their specific location by visiting the official Starlink website and entering their address. This tool will confirm whether service is currently available or if it is expected to be available soon.

Pre-Order and Waitlist Options:

  • In areas where Starlink is not yet available, potential customers can join a waitlist by placing a pre-order. This involves a refundable deposit, which secures their spot in line for when the service becomes available in their area.
  • The waitlist helps Starlink manage demand and prioritize service rollouts based on the number of interested customers in a given region.

Regulatory Approvals and Local Partnerships:

  • Starlink has obtained the necessary regulatory approvals to operate in Kenya, ensuring that the service complies with local laws and standards.
  • Additionally, Starlink has been exploring partnerships with local companies to facilitate distribution, installation, and customer support, making it easier for Kenyans to access and use the service.

Starlink is now widely available in many parts of Kenya, with ongoing expansion into new areas. This widespread availability, combined with the service’s unique benefits, makes Starlink an attractive option for anyone seeking reliable and high-speed internet connectivity, especially in areas where traditional ISPs fall short.

II. Understanding Starlink

How to Buy Starlink Kit in Kenya
Understanding Starlink

A. What is Starlink?

Starlink is a satellite-based internet service developed by SpaceX, the private aerospace company founded by Elon Musk. The primary goal of Starlink is to provide high-speed, low-latency internet access to people around the world, particularly in regions where traditional internet infrastructure is inadequate or non-existent.

Key Features of Starlink:

  1. Global Satellite Network:
    • Starlink operates a constellation of small satellites in low-Earth orbit (LEO), typically at altitudes of around 340 miles (550 kilometers) above the Earth. These satellites work together to create a mesh network that covers most of the planet, enabling users in remote and underserved areas to access the internet.
  2. High-Speed Internet:
    • Starlink delivers broadband internet with speeds that can range from 50 Mbps to over 150 Mbps, depending on the location and network conditions. This makes it a competitive alternative to traditional ISPs, especially in areas where internet access is slow or unreliable.
  3. Low Latency:
    • Unlike traditional satellite internet services, which often have high latency due to the long distance between satellites and Earth, Starlink’s low-Earth orbit allows for much lower latency. This is particularly important for applications requiring real-time interaction, such as video calls, online gaming, and remote work.
  4. User-Friendly Equipment:
    • The Starlink kit includes a satellite dish (often called “Dishy”), a Wi-Fi router, power supply, and mounting tripod. The dish automatically aligns itself to the best satellite connection, making setup straightforward and user-friendly. This ease of use allows individuals and businesses to quickly get online without needing specialized installation services.
  5. Scalability:
    • SpaceX continues to launch new satellites, aiming to eventually deploy thousands more to enhance coverage, increase bandwidth, and further reduce latency. As the constellation grows, the quality and reliability of the service are expected to improve.

Purpose and Vision:

  • The overarching vision of Starlink is to provide reliable, high-speed internet to every corner of the globe, eliminating the digital divide that exists between urban and rural areas. This is particularly crucial in developing countries like Kenya, where internet access can be a significant barrier to economic development, education, and communication.

Starlink represents a revolutionary approach to global internet connectivity, leveraging advanced satellite technology to overcome the limitations of traditional internet infrastructure. For many in Kenya, especially in rural and remote areas, Starlink offers a viable solution to accessing the digital world.

B. How Starlink Works

Starlink operates by utilizing a vast network of low-Earth orbit (LEO) satellites that work in tandem to provide high-speed internet access to users on the ground. Here’s a breakdown of how this system functions:

1. Satellite Constellation:

  • Starlink’s network consists of thousands of small satellites orbiting the Earth at an altitude of approximately 340 miles (550 kilometers). These satellites are positioned in low-Earth orbit, significantly closer to the planet than traditional geostationary satellites, which orbit at much higher altitudes (about 35,000 kilometers).
  • The low-Earth orbit allows Starlink satellites to reduce the distance that data has to travel, resulting in much lower latency compared to traditional satellite internet services.

2. Ground Stations:

  • Data from the internet is transmitted to Starlink’s ground stations, which are strategically located around the world. These ground stations relay the data to the orbiting satellites, which then transmit it to the user’s terminal (the satellite dish).
  • Similarly, data from the user’s terminal is sent back through the satellites to the ground stations, which connect it to the broader internet infrastructure. This bidirectional communication allows users to upload and download data seamlessly.

3. User Terminal (Satellite Dish):

  • Each Starlink user receives a kit that includes a satellite dish, commonly referred to as “Dishy,” along with a Wi-Fi router and necessary cables. The dish is equipped with phased array technology, enabling it to automatically align with the nearest Starlink satellites without requiring manual adjustments.
  • The dish continuously communicates with multiple satellites, ensuring a stable and uninterrupted internet connection. As the satellites move across the sky, the dish dynamically adjusts to maintain a strong signal, providing consistent internet service even in challenging environments.

4. Data Transmission:

  • Starlink’s system uses advanced technology, including laser links between satellites, to route data across the network. These laser links allow satellites to communicate with each other directly in space, reducing reliance on ground stations and enabling more efficient data transmission across vast distances.
  • This method ensures that data can travel quickly from one part of the world to another, resulting in faster internet speeds and lower latency for users.

5. Low Latency and High-Speed Connectivity:

  • Because Starlink satellites are much closer to Earth than traditional satellites, they can offer lower latency—typically around 20-40 milliseconds—making activities like video conferencing, online gaming, and real-time communication much smoother.
  • Starlink’s internet speeds can range from 50 Mbps to 150 Mbps or higher, depending on the location and network conditions. This makes it a competitive option for users who need high-speed internet, especially in areas where other forms of broadband are slow or unreliable.

6. Continuous Network Expansion:

  • SpaceX continues to launch more satellites into orbit, with the goal of improving coverage, increasing bandwidth, and enhancing service quality. As the network expands, Starlink aims to offer even faster speeds and broader coverage, eventually providing global internet access.

Starlink’s innovative use of low-Earth orbit satellites, combined with advanced ground infrastructure and user-friendly technology, enables it to deliver high-speed, low-latency internet to users anywhere on the planet. This system is particularly beneficial in regions like Kenya, where traditional internet services may be limited or unavailable.

C. Benefits of Starlink Over Traditional Internet Service Providers in Kenya

Starlink offers several significant advantages over traditional internet service providers (ISPs) in Kenya, making it an attractive option for both urban and rural users. Here are the key benefits:

 Broad Coverage in Remote Areas:

  • One of the most significant advantages of Starlink is its ability to provide high-speed internet in remote and underserved areas where traditional ISPs struggle to reach. Kenya’s rural regions often lack the infrastructure needed for reliable internet, such as fiber-optic cables or cellular towers. Starlink, with its satellite-based system, bypasses these limitations, offering connectivity virtually anywhere with a clear view of the sky.

High-Speed Internet Access:

  • Starlink delivers broadband speeds that can rival or even exceed those provided by traditional ISPs. Users can experience download speeds ranging from 50 to 150 Mbps, with some areas potentially receiving even higher speeds. This is a game-changer for regions where internet speeds are typically slow and inconsistent.

Low Latency:

  • Traditional satellite internet services often suffer from high latency because of the long distance between geostationary satellites and Earth. Starlink’s low-Earth orbit (LEO) satellites are much closer to the planet, resulting in significantly lower latency (around 20-40 milliseconds). This low latency is essential for real-time activities like video conferencing, online gaming, and other interactive applications, which are challenging on high-latency networks.

4. Quick and Easy Deployment:

  • Establishing traditional internet infrastructure in rural Kenya can take months or even years due to logistical and financial challenges. In contrast, Starlink’s user terminals (satellite dishes) can be set up quickly and easily, allowing users to connect to the internet shortly after receiving their kit. This rapid deployment is particularly beneficial in areas where urgent connectivity is needed.

 Resilience to Environmental Challenges:

  • Kenya’s geography and weather conditions can sometimes disrupt traditional internet services, especially in areas prone to heavy rains, flooding, or terrain challenges that affect ground-based infrastructure. Starlink’s satellite-based service is less vulnerable to these issues, providing a more reliable internet connection regardless of environmental conditions.

Flexibility and Mobility:

  • Starlink offers flexibility that traditional ISPs typically cannot match. The service is portable, meaning users can take their Starlink kit with them if they move to a new location, provided they remain within an area covered by the satellite network. This is especially useful for businesses or individuals who frequently travel or operate in multiple locations.

 Scalability and Future-Proofing:

  • As SpaceX continues to launch more satellites and improve the Starlink network, users can expect even better service quality, faster speeds, and broader coverage. Traditional ISPs may struggle to scale their services as effectively, especially in less populated or less profitable areas. Starlink’s continuous expansion ensures that its service will improve over time, keeping pace with growing demand and technological advancements.

No Long-Term Contracts:

  • Many traditional ISPs in Kenya require customers to commit to long-term contracts, with penalties for early termination. Starlink offers more flexibility with month-to-month billing, allowing users to subscribe without being locked into a lengthy contract. This flexibility is ideal for users who need short-term connectivity or want to avoid long-term commitments.

Potential for Bridging the Digital Divide:

  • Starlink has the potential to significantly bridge the digital divide in Kenya by providing high-speed internet to areas that have been historically neglected by traditional ISPs. This can have profound effects on education, healthcare, business, and overall quality of life in rural and underserved communities, contributing to more equitable access to digital resources across the country.

Starlink’s unique advantages—ranging from broad coverage and high-speed internet to low latency and quick deployment—make it a powerful alternative to traditional ISPs in Kenya. These benefits are particularly impactful in regions where traditional internet infrastructure is lacking, offering a transformative solution for enhancing connectivity and bridging the digital divide.

D. Availability of Starlink in Kenya

Starlink has been progressively expanding its service availability in Kenya, aiming to address the connectivity challenges faced by many regions. Here’s an overview of Starlink’s availability in the country:

Service Expansion:

  • Urban Areas: Starlink initially focused on launching its services in major urban centers like Nairobi, Mombasa, and Kisumu. These cities were among the first to benefit from Starlink’s high-speed internet, addressing the needs of both residential and business users in densely populated areas.
  • Rural and Remote Areas: Following its initial rollout, Starlink has been working to extend its coverage to more rural and remote regions of Kenya. This includes areas that are often underserved by traditional internet providers, such as parts of Turkana, Marsabit, and the Rift Valley.

Coverage Map:

  • Checking Availability: To determine if Starlink service is available in a specific location in Kenya, users can visit the Starlink website and enter their address or location. The website will provide information on whether service is currently available or if there is a waitlist for new customers.
  • Expansion Plans: Starlink is continuously expanding its satellite network and improving coverage. As more satellites are launched and the network grows, availability in additional areas of Kenya is expected to increase.

Pre-Order and Waitlist:

  • Pre-Order: In regions where Starlink service is not yet available, potential customers can place a pre-order to secure their spot in line. This involves a refundable deposit, and customers will be notified when the service becomes available in their area.
  • Waitlist: For areas that are not immediately covered, users can join a waitlist. This allows Starlink to gauge demand and prioritize service rollouts based on the number of interested customers in a given region.

Regulatory Approvals:

  • Compliance: Starlink has obtained the necessary regulatory approvals to operate in Kenya, ensuring that the service complies with local telecommunications regulations and standards.
  • Local Partnerships: To facilitate distribution, installation, and customer support, Starlink has been exploring partnerships with local companies. These partnerships help streamline the process of getting Starlink up and running for Kenyan customers.

Availability Challenges:

  • Infrastructure: While Starlink aims to provide widespread coverage, some areas may still face challenges due to geographical and logistical factors. The company is actively working to overcome these obstacles and expand its reach further.

Future Prospects:

  • Ongoing Expansion: Starlink’s service availability in Kenya is expected to grow as the company continues to launch more satellites and enhance its network. This ongoing expansion will improve internet access for an increasing number of people across the country.

Starlink is progressively expanding its availability in Kenya, initially focusing on urban areas and gradually extending its reach to more rural and remote regions. Prospective users can check service availability online, join waitlists if needed, and look forward to continued expansion as the network grows. With its unique satellite-based approach, Starlink is poised to significantly enhance internet connectivity across Kenya.

III. Steps to Purchase a Starlink Kit in Kenya

How to Buy Starlink Kit in Kenya
Steps to Purchase a Starlink Kit in Kenya

Before purchasing a Starlink kit, it’s essential to verify whether the service is available in your area. Here’s how you can check coverage and service availability in Kenya:

1. Verify Service Availability:

  • Visit the Starlink Website:
    • Go to the Starlink website. On the homepage, you’ll find an option to check service availability. Enter your address or location to see if Starlink service is currently offered in your area.
    • The website will provide real-time information about coverage and inform you if service is available or if there is a waitlist.
  • Use the Starlink Coverage Map:
    • Starlink provides an interactive coverage map that allows you to see current and planned coverage areas. This tool helps you understand if your specific location falls within the service area or if it is expected to be covered in the near future.

2. Tools and Resources to Check Coverage in Kenya:

  • Starlink’s Coverage Checker:
    • This is the primary tool for checking if Starlink service is available in your location. By entering your address, you can quickly determine availability and receive an estimated time frame if you need to join a waitlist.
  • Local Information and Updates:
    • Community Forums and Social Media: Engage with local community forums, social media groups, or online communities focused on Starlink or satellite internet in Kenya. These platforms can provide insights from other users about service availability and experiences in various regions.
    • Starlink Kenya’s Official Channels: Follow Starlink’s official social media accounts or sign up for newsletters to receive updates about service expansion, availability in new areas, and other important announcements.
  • Contact Starlink Support:
    • If you have specific questions about service availability or coverage in your area, you can contact Starlink customer support. They can provide detailed information and address any concerns you might have.
  • Local Partners and Distributors:
    • Starlink may partner with local distributors or service providers in Kenya to assist with coverage information and distribution. Contacting these local partners can provide additional insights into availability and the process of obtaining a Starlink kit.

By using these tools and resources, you can accurately determine whether Starlink is available in your area and make informed decisions about purchasing and setting up your internet service. If Starlink is not yet available in your location, you may need to join a waitlist and monitor updates for when service becomes accessible.

B. Create a Starlink Account

To purchase a Starlink kit and start using the service, you’ll need to create an account on the Starlink website. Here’s a step-by-step guide on how to sign up, the information you’ll need, and why it’s important to use accurate details:

1. How to Sign Up on the Starlink Website:

  • Visit the Starlink Website:
    • Go to the Starlink website. Look for the option to sign up or create an account. This is typically found on the homepage or in the top navigation menu.
  • Enter Your Location:
    • Before you can create an account, you will need to check the availability of Starlink in your area. Enter your address or location to confirm that service is offered in your region. If available, you will be directed to proceed with the sign-up process.
  • Start the Registration Process:
    • Click on the sign-up or “Order Now” button. You will be guided through a series of steps to create your account and place your order.
  • Provide Personal Information:
    • You will need to provide your personal details, including your name, email address, phone number, and physical address. Ensure that the address you provide matches the location where you want to install the Starlink kit.
  • Create a Password:
    • Choose a strong and secure password for your account. This password will be used to access your Starlink account and manage your service.
  • Review and Confirm:
    • Review all the information you’ve entered to ensure it is correct. Confirm your details and agree to any terms and conditions.
  • Complete the Registration:
    • Submit your registration and wait for a confirmation email from Starlink. This email will typically include details about your order and any next steps.

2. Information Needed for Account Creation:

  • Personal Details:
    • Full name
    • Email address
    • Phone number
  • Address:
    • Accurate physical address where you want the Starlink kit to be delivered and installed. This includes street address, city, and postal code.
  • Payment Information:
    • Credit or debit card details for processing the payment for the Starlink kit. Ensure that your payment information is entered securely and correctly.

3. Importance of Using Accurate Details:

  • Service Accuracy:

    • Providing accurate address information is crucial for ensuring that Starlink can deliver and set up the kit correctly. An incorrect address might lead to delays or issues with installation.
  • Billing and Communication:

    • Accurate personal and payment information ensures that billing is processed correctly and that you receive important updates and communications from Starlink regarding your service.
  • Account Management:

    • Using correct details helps in managing your Starlink account effectively. This includes accessing support, managing service settings, and receiving notifications.
  • Avoiding Issues:

    • Inaccurate information can lead to problems with delivery, billing, and support. Ensuring that all details are correct helps avoid unnecessary complications and ensures a smoother setup process.

By following these steps and providing accurate information, you can successfully create a Starlink account, order your kit, and begin enjoying high-speed internet service in Kenya.

C. Place an Order for the Starlink Kit

Here’s a step-by-step guide on how to place an order for a Starlink kit, choose the right kit for your needs, and customize your order:

1. Step-by-Step Guide on Navigating the Starlink Website:

  • Access the Starlink Website:
  • Check Service Availability:
    • Before placing an order, ensure that Starlink service is available in your location by entering your address on the service availability checker. If service is available, you will be directed to proceed with the order.
  • Start the Ordering Process:
    • Look for the option to “Order Now” or “Get Starlink” on the website. Click this button to begin the ordering process.
  • Create or Log In to Your Account:
    • If you haven’t already created an account, you’ll be prompted to do so. If you already have an account, log in using your email address and password.
  • Select Your Kit:
    • You will be presented with options for purchasing the Starlink kit. Choose the kit that suits your needs. The standard kit typically includes the satellite dish, Wi-Fi router, power supply, and mounting tripod.
  • Review Your Order:
    • Review the details of your order, including the kit specifications, pricing, and shipping information. Ensure that everything is correct before proceeding.
  • Proceed to Checkout:
    • Click on the checkout button to move to the payment and confirmation stage.

2. Choosing the Right Kit for Your Needs:

  • Standard Kit:
    • The standard Starlink kit includes everything you need to get started: the satellite dish, router, power supply, and mounting equipment. This is suitable for most users and is the primary option offered.
  • Business Kit (if available):
    • Some regions may offer a business kit designed for commercial use or higher bandwidth needs. If you have specific business requirements, check if this option is available and suitable for your needs.
  • Additional Accessories:
    • Starlink may offer optional accessories such as wall mounts, custom mounting poles, or weatherproofing kits. Consider whether any of these accessories would be useful for your installation.

3. Customizing Your Order:

  • Add Accessories:
    • During the ordering process, you may have the option to add accessories to your order. This could include items like:
      • Mounting Equipment: Additional mounting options if you need to install the dish in a specific location.
      • Cable Extensions: Longer cables if the standard ones are not sufficient for your installation needs.
      • Power Supply Adapters: Different adapters if you have specific power requirements.
  • Review Customizations:
    • Make sure to review all customizations and additional items to ensure they fit your needs. Check the pricing for each accessory and how it affects the total cost of your order.
  • Confirm and Place Order:
    • Once you have selected your kit and any additional accessories, review your final order summary. Confirm all details, including shipping information and payment method.
  • Payment:
    • Enter your payment details, such as credit or debit card information. Ensure that the payment is processed securely.
  • Order Confirmation:
    • After placing your order, you will receive an order confirmation email from Starlink. This email will include details about your purchase, estimated shipping times, and tracking information.

By following these steps, you can successfully navigate the Starlink website, choose the right kit and accessories for your needs, and place your order with confidence. This ensures that you get the equipment and services required for a smooth and efficient internet setup.

D. Payment Process

1. Accepted Payment Methods for Kenyan Customers:

  • Credit and Debit Cards:
    • Starlink accepts major credit and debit cards, including Visa, MasterCard, and American Express. Ensure your card is enabled for international transactions, as Starlink is a global service provider.
  • Online Payment Platforms:
    • While Starlink primarily uses credit and debit cards, check if there are any updates or additional payment options available in Kenya, such as PayPal or local payment gateways, through the Starlink website or customer support.
  • Bank Transfers:
    • Direct bank transfers are generally not an option for Starlink payments. However, if you prefer this method, contact Starlink customer support to see if any alternative arrangements can be made.

2. Approximate Costs Including Shipping and Taxes:

  • Starlink Kit Pricing:
    • The standard Starlink kit typically costs around $549 USD. This price includes the satellite dish, router, power supply, and mounting equipment. Prices may vary based on exchange rates and local conditions.
  • Shipping Costs:
    • Shipping costs to Kenya can vary depending on your location and any current promotions or policies. On average, shipping costs might range from $50 to $150 USD.
  • Taxes and Duties:
    • Import duties and taxes are applicable for shipments to Kenya. These can include VAT and customs duties, which vary based on local regulations. Be prepared for additional charges, which could be around 10-25% of the kit’s price, depending on the value and shipping details.
  • Total Estimated Cost:
    • The total cost, including the Starlink kit, shipping, and taxes, could range from approximately $600 to $800 USD or more. Ensure to check the final amount during the checkout process on the Starlink website.

3. Tips for Secure Online Payment:

  • Use Secure Payment Methods:
    • Opt for secure payment methods like credit or debit cards with fraud protection. Avoid using public Wi-Fi networks for financial transactions.
  • Verify Website Security:
    • Ensure that the Starlink website is secure before entering your payment information. Look for a padlock icon in the browser’s address bar and verify that the URL starts with “https://.”
  • Monitor Your Statements:
    • Regularly check your credit or debit card statements for any unauthorized transactions. Report any suspicious activity to your bank or card issuer immediately.
  • Enable Two-Factor Authentication:
    • If your card issuer offers two-factor authentication (2FA) for online purchases, enable it for an added layer of security.
  • Use Strong Passwords:
    • Create strong, unique passwords for your Starlink account and payment methods. Avoid using easily guessable passwords or reusing passwords from other accounts.
  • Keep Contact Information Updated:
    • Ensure your contact information is up-to-date on your Starlink account and with your bank to receive timely alerts about transactions and any issues with your payment.

By following these guidelines, you can ensure a smooth and secure payment process when ordering your Starlink kit in Kenya. Proper attention to payment methods, costs, and security can help avoid issues and facilitate a successful purchase.

E. Shipping and Delivery

1. Expected Shipping Times for Kenya:

  • Standard Shipping Time:
    • Shipping times for Starlink kits to Kenya typically range from 2 to 6 weeks. This can vary based on factors such as the shipping method used, customs processing, and your specific location within Kenya.
  • International Shipping Considerations:
    • Since Starlink is a global service, shipping times may be influenced by international shipping logistics and potential delays in customs. Expect some variability in delivery times depending on these factors.

2. How to Track Your Order:

  • Order Confirmation Email:
    • After placing your order, you will receive an order confirmation email from Starlink. This email will include a summary of your order and an estimated delivery date.
  • Tracking Information:
    • Once your Starlink kit has been shipped, you will receive a shipping confirmation email with a tracking number. This tracking number can be used to monitor the progress of your shipment.
  • Tracking Website:
    • Use the tracking number on the courier’s website to check the status of your delivery. Starlink’s shipping partners may include international carriers such as DHL, FedEx, or UPS. Visit their respective websites and enter your tracking number to get real-time updates on your shipment.
  • Starlink Account:
    • You can also check your order status and tracking information by logging into your Starlink account on their website. Look for an “Orders” or “Shipping” section to view details about your shipment.

3. What to Do If There Are Delays or Issues with Delivery:

  • Contact Starlink Support:
    • If you experience any delays or issues with your delivery, contact Starlink customer support for assistance. Provide your order number and tracking details to help them investigate and resolve the issue.
  • Check with the Courier:
    • If the shipment is delayed or you encounter issues such as incorrect delivery information, contact the courier service directly. Use the tracking number to get in touch with their customer service for more detailed information and resolution.
  • Verify Customs Status:
    • Sometimes, delays can occur due to customs processing. Check with your local customs office to ensure that there are no issues or additional requirements for your shipment.
  • Review Shipping Information:
    • Ensure that the shipping address you provided is accurate and complete. Incorrect or incomplete addresses can lead to delays or delivery issues.
  • Follow Up:
    • If the issue persists, continue to follow up with both Starlink support and the courier service until the problem is resolved. Keep detailed records of all communications and tracking updates for reference.

By understanding the expected shipping times, using tracking tools effectively, and knowing how to address any delivery issues, you can manage your Starlink kit’s shipment process smoothly. Proper tracking and prompt communication with support can help ensure that you receive your Starlink kit in a timely manner and enjoy reliable internet connectivity.

F. Installation of the Starlink Kit

1. Unboxing and Setting Up the Kit:

  • Unboxing the Kit:
    • Carefully open the Starlink package. Inside, you should find:
      • The Starlink satellite dish (also known as the dish or antenna)
      • A Wi-Fi router
      • A power supply unit
      • Mounting equipment (e.g., mounting tripod)
      • Cables (power cable, data cable)
      • Quick start guide and other documentation
  • Preparing for Installation:
    • Choose a location for your dish with a clear view of the sky, free from obstructions such as trees, buildings, or other structures that might block the satellite signal.
    • Ensure the installation area has access to a power source and a stable surface for mounting the dish.

2. Basic Installation Steps:

  • Assemble the Mounting Equipment:
    • If using a tripod, assemble it according to the instructions provided. Place it in the chosen location where you want to install the dish.
  • Install the Dish:
    • Attach the dish to the mounting equipment. Ensure it is securely fastened and oriented in a position that allows for a clear line of sight to the sky.
    • If you are using a wall or pole mount, follow the instructions for securely attaching the dish to the chosen surface.
  • Connect the Cables:
    • Connect the data cable from the dish to the Wi-Fi router. Plug one end of the cable into the dish’s port and the other end into the router’s designated port.
    • Connect the power supply unit to the router and then to a power outlet. Ensure that all connections are firm and secure.
  • Power Up the System:
    • Turn on the power supply and the router. The dish will begin to calibrate and align itself automatically. This process may take a few minutes. During this time, the dish will adjust its position to find the optimal satellite signal.
  • Set Up the Wi-Fi Router:
    • Follow the instructions in the quick start guide to configure your Wi-Fi router. This typically involves connecting to the router’s temporary Wi-Fi network using a computer or smartphone and following the setup instructions provided in the guide.
  • Connect to the Internet:
    • Once the router is configured, connect your devices to the new Wi-Fi network. Test the internet connection to ensure it is working correctly.

3. Troubleshooting Common Issues During Installation:

  • Dish Not Calibrating:
    • If the dish does not seem to calibrate or align properly, ensure there are no obstructions blocking the view of the sky. Check all connections to make sure they are secure.
    • Verify that the dish is properly mounted and not moved during the calibration process.
  • No Signal:
    • If you are not getting a signal, check that the dish is correctly connected to the router and power supply. Make sure the cables are firmly plugged in and not damaged.
    • Confirm that the dish has a clear view of the sky. Large objects or interference can affect the signal.
  • Wi-Fi Router Issues:
    • If the Wi-Fi router is not functioning properly, restart the router by unplugging it and then plugging it back in. Check the router’s connections and ensure it is properly powered.
    • Ensure that the router is configured according to the instructions provided in the quick start guide.
  • Intermittent Connection:
    • If the connection is intermittent or slow, check for any physical obstructions or interference around the dish. Ensure the dish is properly aligned and has a stable mounting.
    • Restart both the router and the dish to see if this resolves the issue.
  • Technical Support:
    • If you encounter persistent issues that you cannot resolve, contact Starlink customer support. Provide details about your installation, the problems you are experiencing, and any troubleshooting steps you have already taken.

By following these steps and troubleshooting tips, you can successfully install your Starlink kit and enjoy reliable internet connectivity. Proper installation and prompt resolution of any issues will ensure that you get the most out of your Starlink service.

IV. Post-Purchase Considerations

How to Buy Starlink Kit in Kenya
Post-Purchase Considerations

A. How to Activate and Register Your Starlink Service

After purchasing and installing your Starlink kit, you’ll need to activate and register your service to start using it. Here’s a step-by-step guide on how to do this:

1. Power Up and Initial Setup:

  • Ensure Proper Installation:

    • Before activating your service, make sure that the Starlink dish and router are correctly installed and powered on. The dish should be properly aligned, and all cables should be securely connected.
  • Wait for Dish Calibration:

    • When you first power on the Starlink system, the dish will automatically calibrate and align itself to find the optimal satellite signal. This process can take several minutes. Ensure the dish remains stationary during this time.

2. Connect to the Starlink Network:

  • Connect to the Router’s Network:
    • Use your computer or smartphone to connect to the Wi-Fi network broadcasted by the Starlink router. The network name (SSID) and password are typically provided in the quick start guide that came with your kit.
  • Access the Setup Portal:
    • Open a web browser and enter the URL provided in the quick start guide (usually something like this) to access the Starlink setup portal. This portal will guide you through the activation process.

3. Activate Your Service:

  • Create or Log In to Your Starlink Account:
    • If you haven’t already created an account during the purchase process, you’ll need to do so now. Provide the required information such as your name, email address, and physical address.
    • Log in to your Starlink account if you already have one.
  • Follow the Activation Instructions:
    • The setup portal will guide you through the activation process. This typically involves:
      • Confirming your location.
      • Verifying your service plan.
      • Accepting the terms and conditions of service.
  • Update Your Account Information:
    • Make sure your account information, including your address and payment details, is accurate and up-to-date. This ensures that your service is activated correctly and that you receive any necessary updates.

4. Confirm Activation and Test the Connection:

  • Check Service Status:
    • Once activation is complete, you should see a confirmation message in the setup portal indicating that your Starlink service is active. The dish will start providing a stable internet connection.
  • Test Your Connection:
    • Connect your devices to the Starlink Wi-Fi network and test the internet connection. Ensure you are getting the expected speeds and that the connection is stable.
  • Troubleshoot if Necessary:
    • If you encounter any issues during activation or if the connection is not working as expected, refer to the troubleshooting section in the quick start guide or contact Starlink customer support for assistance.

5. Ongoing Management:

  • Manage Your Account:
    • Log in to your Starlink account on the Starlink website or app to manage your service. This includes monitoring usage, paying bills, updating account details, and accessing customer support.
  • Stay Updated:
    • Keep an eye on any communications from Starlink regarding service updates, maintenance schedules, or changes to your plan.

By following these steps, you can successfully activate and register your Starlink service, ensuring a smooth transition to high-speed satellite internet. If you encounter any issues, Starlink’s customer support is available to assist with activation and ongoing service management.

B. Managing Your Starlink Account and Settings

Once your Starlink service is activated, you’ll need to manage your account and settings to ensure optimal performance and address any changes or issues. Here’s how to effectively manage your Starlink account:

1. Accessing Your Account:

  • Starlink Website or App:
    • You can manage your Starlink account via the Starlink website or the Starlink app. Log in using the credentials you created during the account setup process.
  • URL for Website:
    • Visit the Starlink website and click on the “Login” button to access your account. Enter your email address and password to log in.
  • Starlink App:
    • Download the Starlink app from the Apple App Store or Google Play Store if you haven’t already. The app provides a convenient way to manage your account and settings from your mobile device.

2. Managing Account Information:

  • Update Personal Details:
    • You can update your personal information, such as your name, email address, and phone number, through the account settings. Ensure that your contact information is current to receive important updates and notifications.
  • Billing and Payment Information:
    • Access the billing section to view your payment history, update your payment methods, and manage subscription plans. You can also view invoices and make payments directly through your account.
  • Service Plan:
    • Review and modify your service plan if needed. This might include upgrading or downgrading your plan, changing your data usage limits, or adding additional features.

3. Network and Device Settings:

  • Wi-Fi Network Configuration:
    • Adjust Wi-Fi network settings such as SSID (network name), password, and security settings through the account management interface. This ensures that your network is secure and configured to your preferences.
  • Device Management:
    • View and manage connected devices through your account. You can see which devices are currently connected to your network and manage their access if needed.
  • Performance Monitoring:
    • Check the performance metrics of your Starlink system, including connection speed, signal strength, and data usage. This helps you monitor the health of your connection and identify any issues.

4. Troubleshooting and Support:

  • Access Support Resources:
    • Use the support section of your account to access troubleshooting guides, FAQs, and other resources that can help resolve common issues.
  • Contact Customer Support:
    • If you need further assistance, you can contact Starlink customer support directly through your account. Provide details about any issues you’re experiencing to get effective support.
  • Submit Feedback:
    • Provide feedback on your service experience through the account interface. Your feedback helps Starlink improve their services and address any concerns you might have.

5. Managing Notifications and Alerts:

  • Email and SMS Notifications:
    • Manage your notification preferences to receive updates about your service, maintenance schedules, and important announcements. You can choose to receive notifications via email or SMS based on your preferences.
  • App Notifications:
    • Configure notifications in the Starlink app to stay informed about service status, performance updates, and other relevant information.

By effectively managing your Starlink account and settings, you can ensure that your service operates smoothly, address any issues promptly, and keep your network optimized for your needs. Regularly checking and updating your account settings helps maintain a high-quality internet experience.

C. Customer Support Options in Kenya

Starlink provides various customer support options to assist users in Kenya with any issues or questions regarding their service. Here’s how you can access support and what to expect:

1. Starlink Support Portal:

  • Online Support Portal:
    • Visit the Starlink Support Portal for access to a range of resources, including troubleshooting guides, FAQs, and support articles. This is a good starting point for resolving common issues and finding information about your service.
  • Search for Help:
    • Use the search feature on the support portal to find articles and solutions related to specific problems or questions you may have.

2. Contacting Starlink Support:

  • Support Tickets:
    • If you cannot find a solution in the support portal, you can submit a support ticket through the portal. Provide detailed information about your issue, including your account details, and describe the problem you are experiencing. Starlink’s support team will review your ticket and respond with assistance.
  • Email Support:
    • You can also reach out to Starlink support via email. Send your inquiries or issues to the email address provided in your order confirmation or support documentation. Include relevant details such as your account information and a description of the issue.
  • Phone Support:
    • Starlink may offer phone support for more urgent issues or complex queries. Check the support portal or your account for the appropriate contact number. If phone support is available, it is usually listed in the contact information section of your account.

3. Local Support and Community:

  • Local Starlink Offices:
    • While Starlink’s support is primarily handled online, you may check if there are any local representatives or offices in Kenya that can provide in-person support or assistance. This information may be available on the Starlink website or through customer support.
  • Online Community and Forums:
    • Join online forums or community groups where Starlink users share their experiences and offer advice. These can be helpful for finding solutions to common issues or learning more about optimizing your Starlink service.

4. Troubleshooting Common Issues:

  • Self-Troubleshooting:
    • Refer to the troubleshooting guides available on the Starlink Support Portal. Common issues such as connectivity problems, signal interference, or equipment malfunctions often have documented solutions.
  • Regular Maintenance:
    • Keep your equipment clean and ensure that the dish remains unobstructed to avoid performance issues. Regularly check the cables and connections to maintain optimal service.

5. Service Outages and Maintenance:

  • Check for Outages:
    • If you experience a service disruption, check the Starlink website or support portal for any announcements regarding outages or maintenance. Starlink often provides updates on service status and expected resolution times.
  • Report Outages:
    • If you believe there is an outage or ongoing issue in your area, report it through the support portal or contact customer support. Providing details about your location and the nature of the problem will help in resolving the issue.

By utilizing these support options, you can effectively address any issues with your Starlink service and ensure a smooth and reliable internet experience. Starlink’s support resources and customer service channels are designed to assist you with troubleshooting, account management, and any other concerns you may have.

D. Maintenance and Care Tips for Your Starlink Kit

To ensure optimal performance and longevity of your Starlink kit, regular maintenance and proper care are essential. Here are some tips to help you keep your equipment in top condition:

1. Keep the Dish Clean and Clear:

  • Regular Cleaning:
    • Gently clean the Starlink dish with a soft, non-abrasive cloth and mild soap solution to remove dust, dirt, and debris. Avoid using harsh chemicals or abrasive materials that could damage the dish’s surface.
  • Avoid Harsh Weather:
    • While the dish is designed to withstand various weather conditions, try to keep it free of excessive snow, ice, or debris. If snow or ice accumulates, carefully remove it to prevent obstruction of the signal.
  • Check for Obstructions:
    • Periodically inspect the area around the dish to ensure there are no new obstructions such as branches, leaves, or structures that could block the satellite signal. Maintain a clear line of sight to the sky.

2. Inspect Cables and Connections:

  • Regular Inspection:
    • Check all cables and connections to ensure they are securely attached and not damaged. Look for signs of wear or fraying in the cables.
  • Secure Connections:
    • Make sure that all connections between the dish, router, and power supply are firm and properly seated. Loose connections can lead to performance issues.
  • Avoid Cable Damage:
    • Protect cables from physical damage by ensuring they are not pinched, bent sharply, or exposed to harsh conditions. Use cable clips or ties to secure them in place.

3. Protect the Equipment:

  • Weather Protection:
    • Ensure the dish is mounted securely and protected from extreme weather conditions. If possible, use weather-resistant materials or covers for added protection.
  • Avoid Physical Damage:
    • Handle the equipment with care to avoid physical damage. Be cautious when adjusting or moving the dish and avoid dropping or banging the components.

4. Monitor System Performance:

  • Check Performance Regularly:
    • Use the Starlink app or web portal to monitor the performance of your system, including signal strength, connection speeds, and data usage. Regular checks can help you identify and address potential issues early.
  • Address Performance Issues:
    • If you notice a decline in performance, investigate potential causes such as obstructions, signal interference, or equipment issues. Follow troubleshooting steps or contact support if necessary.

5. Update and Upgrade:

  • Firmware Updates:
    • Keep your Starlink router and dish firmware up to date by following any instructions provided by Starlink. Firmware updates can improve performance and fix known issues.
  • Check for Equipment Upgrades:
    • Occasionally check for any hardware upgrades or new equipment options offered by Starlink that could enhance your system’s performance.

6. Seasonal Considerations:

  • Winter Care:
    • In winter, ensure the dish is free from snow and ice accumulation. Gently brush off any snow and clear ice to maintain signal quality.
  • Summer Care:
    • In hot weather, ensure the equipment is well-ventilated and not exposed to excessive heat. Avoid placing the equipment in direct sunlight for extended periods.

7. Safety Precautions:

  • Electrical Safety:
    • Ensure that all electrical connections are properly insulated and protected from water or moisture. Avoid using damaged power supplies or cables.
  • Professional Assistance:
    • If you encounter complex issues or require adjustments to your setup, consider seeking professional assistance rather than attempting potentially risky repairs yourself.

By following these maintenance and care tips, you can help ensure that your Starlink kit remains in good working condition, providing reliable internet connectivity for years to come. Regular attention to the equipment and prompt action to address any issues will contribute to a smooth and efficient Starlink experience.

VI. Conclusion

How to Buy Starlink Kit in Kenya

A. Recap of the Steps to Purchase a Starlink Kit in Kenya

Purchasing a Starlink kit in Kenya involves several key steps to ensure a smooth and successful acquisition and setup. Here’s a summary of the process:

1. Check Coverage and Service Availability:

  • Verify Coverage: Confirm if Starlink service is available in your area using the coverage map and tools provided on the Starlink website. Ensure your location meets the requirements for service.

2. Create a Starlink Account:

  • Sign Up: Register for a Starlink account on the Starlink website. Provide necessary details such as your name, address, and contact information. Accurate information is crucial for proper service setup and delivery.

3. Place an Order for the Starlink Kit:

  • Navigate the Website: Access the Starlink website to place your order. Select the appropriate kit and any additional accessories you may need. Follow the prompts to complete the purchase process.

4. Payment Process:

  • Payment Methods: Choose from accepted payment methods for Kenyan customers. Be aware of the costs, including shipping and taxes. Ensure secure online payment to protect your financial information.

5. Shipping and Delivery:

  • Track Your Order: Once your order is confirmed, track the shipment using the provided tracking number. Be prepared for a delivery window of 2 to 6 weeks. Contact support if there are any delays or issues.

6. Installation of the Starlink Kit:

  • Setup: Unbox and set up the kit following the provided instructions. Ensure the dish is properly mounted with a clear view of the sky and all cables are securely connected. Power up the system and follow the setup guide to connect to the internet.

7. Activate and Register Your Service:

  • Activation: Log into your Starlink account and follow the instructions to activate and register your service. Verify that all information is correct and test the connection to ensure it is working properly.

8. Manage Your Starlink Account and Settings:

  • Account Management: Access and manage your account through the Starlink website or app. Update personal and payment information, configure network settings, and monitor system performance.

9. Customer Support and Maintenance:

  • Support Options: Utilize customer support resources if you encounter issues. Options include online support, email, phone, and local resources if available. Follow maintenance and care tips to keep your equipment in good condition.

By following these steps, you can successfully purchase, set up, and manage your Starlink kit, ensuring reliable internet connectivity and a smooth user experience in Kenya.

B. Final Tips for a Smooth Buying Experience

To ensure a seamless and satisfactory experience when purchasing and setting up your Starlink kit in Kenya, consider the following tips:

1. Research Before Buying:

  • Understand the Service: Familiarize yourself with how Starlink works and its benefits compared to traditional internet options. This helps set realistic expectations about performance and service coverage.
  • Check Coverage: Confirm that Starlink is available in your area using the coverage map and resources provided on their website.

2. Plan Your Purchase:

  • Budget for Costs: Include the cost of the kit, shipping, and any applicable taxes in your budget. Be prepared for additional fees that might arise during the purchase process.
  • Review Payment Options: Choose a secure and convenient payment method. Make sure your payment details are accurate to avoid delays.

3. Prepare for Installation:

  • Choose an Optimal Location: Select a location for the dish with a clear view of the sky and minimal obstructions. This will improve signal strength and connectivity.
  • Check Equipment Requirements: Ensure you have a stable power source and the necessary tools for installation. Review the installation guide before starting the setup process.

4. Follow Setup Instructions Carefully:

  • Adhere to the Manual: Follow the installation and setup instructions provided in the Starlink kit carefully. This will help avoid common issues and ensure proper configuration.
  • Perform Initial Tests: Once installed, test the connection thoroughly to confirm that everything is working as expected. Address any issues promptly.

5. Utilize Support Resources:

  • Access the Support Portal: Use the Starlink support portal for troubleshooting and guidance. Familiarize yourself with the resources available for resolving common issues.
  • Contact Support If Needed: Don’t hesitate to reach out to Starlink’s customer support if you encounter difficulties. Providing detailed information about your issue will help in getting effective assistance.

6. Maintain Your Equipment:

  • Regular Maintenance: Clean and inspect your equipment regularly to prevent issues. Keep the dish clear of obstructions and debris.
  • Monitor Performance: Use the Starlink app or website to monitor your system’s performance and address any concerns proactively.

7. Stay Informed:

  • Check for Updates: Stay updated with any new features, firmware updates, or changes to the service that may enhance your experience.
  • Engage with the Community: Join online forums or local groups of Starlink users to share experiences, get tips, and learn from others.

By keeping these tips in mind, you can ensure a smooth and successful purchasing experience with Starlink, leading to reliable internet connectivity and overall satisfaction with your service.

C. Encouragement to Join the Growing Community of Starlink Users in Kenya

As Starlink expands its reach in Kenya, joining this innovative network of users offers numerous benefits and opportunities. Here’s why you should consider becoming a part of the growing Starlink community:

1. Access to High-Speed Internet:

  • Reliable Connectivity: Starlink provides high-speed internet access, especially valuable in areas where traditional providers may fall short. Experience consistent and fast internet speeds that enable you to stay connected with ease.

2. Support Technological Advancement:

  • Be Part of Innovation: By joining Starlink, you contribute to the advancement of satellite technology and the expansion of internet access in Kenya. You’ll be part of a movement that’s shaping the future of global connectivity.

3. Join a Community of Pioneers:

  • Share Experiences: Connect with fellow Starlink users to share tips, experiences, and troubleshooting advice. Engage in discussions about the latest developments and make the most of your Starlink service.
  • Local Networks: Find and participate in local user groups or online forums where you can exchange knowledge and support each other in optimizing your Starlink experience.

4. Benefit from Improved Internet Access:

  • Enhanced Opportunities: Reliable internet opens doors to educational resources, remote work opportunities, and access to online services that may have been previously limited. Embrace the benefits of improved connectivity for personal and professional growth.

5. Contribute to Community Development:

  • Expand Access: By adopting Starlink, you’re supporting the effort to improve internet access in underserved and rural areas. Your participation helps demonstrate the demand for such services and encourages further expansion.

6. Stay Informed and Engaged:

  • Receive Updates: Stay informed about new features, updates, and improvements to the Starlink service. Your involvement ensures you’re always up-to-date with the latest advancements.
  • Provide Feedback: Share your experiences and feedback with Starlink to help improve the service. Your input can contribute to better products and support for all users.

7. Embrace the Future of Connectivity:

  • Innovative Solutions: Starlink represents a leap forward in internet technology, providing solutions that are changing how people connect around the world. Being a part of this movement positions you at the forefront of digital innovation.

By joining the Starlink community, you’re not just getting a new internet service; you’re becoming part of a transformative initiative that’s enhancing connectivity and bridging the digital divide in Kenya. Embrace the opportunity to be connected, informed, and engaged with a network that’s leading the way in global internet access.